|
MapCatalog | Order | Support | SiteIndex | Contact | Home | ||||||||||
|
|
|
|
|
|
|
|||||||||||
| MH Maps | Photoshop | CorelDraw | Illustrator | FreeHand | Quark | |||||||||||

Online User Guide - FreeHand
Using Mountain High Maps with Macromedia FreeHand
|
MapCatalog | Order | Support | SiteIndex | Contact | Home | ||||||||||
|
|
|
|
|
|
|
|||||||||||
| MH Maps | Photoshop | CorelDraw | Illustrator | FreeHand | Quark | |||||||||||
Online User Guide - FreeHand
Using Mountain High Maps with Macromedia FreeHand
The FreeHand files in your Mountain High Maps collection are saved in FreeHand versions 3.1 and 7.0 (Mac). Windows FreeHand files are saved in version 7.0. FreeHand has undergone many significant changes (and ownerships) since then, but the files on these discs are readable by all versions since 3.1. For the tips explained in this document, we have used Macromedia FreeHand version 7.0, but some of the tips also apply to earlier (and later) versions -- they just work in a different way.
FreeHand files are "vector" files, meaning they can be used at any size, without requiring any change of resolution--unlike the relief maps and masks, which are bitmapped, and which may require additional treatment in an image manipulation application if they are to be used at wildly differing sizes from the originals.
The FreeHand files are identified in the Mountain High Maps collection by the suffix ".fh3" or ".fh7" (Mac), or ".FH7" (Win).
A note for FreeHand 3.1 users (Mac only)
The FreeHand files on your Mountain High Maps discs contain a layer called "Relief TIFF." On this layer we have placed the masked version of the corresponding grayscale base relief map. The Tiff is positioned at the zero axis of the map (lower left corner).Users of FreeHand version 3.1 may notice that on some maps (not all) the cyan coastline does not fit exactly to the relief map coastline -- you may see a hairline gap at large magnifications at the opposite extremity of the map from the zero point. This is due to a "rounding" problem in FreeHand 3.1 -- acknowledged by Aldus (then owners of FreeHand) -- where it recalculates and rounds the size of imported high resolution TIFF files.
The best remedy for correcting this aberration is to upgrade to a later version of FreeHand, where the problem of inaccurate rounding of imported high resolution images does not occur, and consequently the relief maps fit exactly to the outline maps.
However, if you prefer to stay with FreeHand 3.1, here's how to make the relief TIFFs fit the outline maps:
- Make the relief map visible by clicking to the left of the "Relief TIFF" layer. The placed TIFF becomes visible when the layer is checked.
- Click on the grayscale map to make it active.
- Switch to Keyline view, and, using the Magnify tool, zoom in as close as you can to the top right corner of the map.
- Click on the corner point of the active TIFF box and drag it to the top right corner of the box rule - make sure you move just the corner point and not the whole map. Matching the corner of the relief map precisely to the box rule is easier if you have "Snap to Point" checked ("View" Menu).
That's it! The relief map coastline will now fit exactly to the cyan coastline of the FreeHand file. But remember -- the above procedure isn't necessary if you use later versions of FreeHand.
Layers
When you open one of the FreeHand files, you will be presented with a map featuring a coastlines, borders, rivers, cities, names, graticules (lines of latitude and longitude), and a scale. To get the full benefit from these files, make sure you have the "Layers" floating palette open by choosing "View > Windows > Layers" menu (version 3.1), or "Window > Layers..." (version 4.0 and later). You will see from the Layers palette that not all layers are checked. By clicking at the left margin of any other layer name a check mark appears, and that layer becomes visible.The layers are as follows:
Box rule: This is a 1 point black box rule of precisely the same dimensions as the corresponding relief map on your Mountain High Maps disc.
Scales: This is a "grouped" graphic -- to ungroup it, select "Arrange > Ungroup." Most of the projections used in the Mountain High Map collection are "equal area," so the scale can be used to measure distances at any point on the map. However, some distortion occurs on the world maps, and on these maps the scale is calibrated at the Equator.
Graticules: This is a 0.25 point red line describing the meridians of longitude and parallels of latitude.
Graticule labels: This contains annotation for the intervals between each graticule, measured in degrees.
City/town locations: These are 1.5mm diameter black dots indicating the locations of major cities and towns.
City/town names: This layer displays the names of all of cities and towns featured on the opened map.
Physical features, land: This layer displays the names of rivers featured on the opened map.
Physical features, ocean: This layer displays the names of rivers featured on the opened map.
Island names: This layer displays the names of rivers featured on the opened map.
River names: This layer displays the names of rivers featured on the opened map.
Country names: This layer displays the names of all the countries featured on the opened map.
Countries: When you select any country from those listed, that country will be visible as a 0.25 point (hairline) black path. To change the thickness and color of an individual country border, select the path (hide all the other layers and choose "Select all" from the Edit menu), and choose "Attributes > Fill and line..." (version 3.1) or use the "Inspector" palette (version 4.0 and later).
Coastline: This is visible as a 0.25 point (hairline) cyan path. NOTE: Some coastlines are very complex, and if you intend printing a complex map at a small size, the coastline may fill in unless it is printed as a very fine line or is made less complex. If you use FreeHand version 4.0 (or later), you can make a path less complex by selecting the path and then choosing "Arrange > Path operations > Simplify" menu.
Rivers: These are visible as 0.25 point (hairline) cyan paths.
Borders: These are visible as 0.5 point magenta paths. Country borders are mostly colored magenta; those borders which are colored purple are either disputed or undefined Refer to the "Disputed borders" document in this folder for more information.
Lakes Fill: This layer contains white fills for lakes and inland water areas.
Relief TIFF: This layer is where you will find the placed corresponding grayscale relief map. It is invisible when you first open the map, to speed up screen redraw. If you do not need relief in your map, be sure to delete this layer before working on the map (use "Options > Remove" on the Layers palette). For more about using the relief TIFFs, see below.
Changing Fonts
The font used on all maps is Helvetica. You can change fonts and font sizes in one of two ways:Changing individual names or all names on a single layer:
- Select a name by clicking on it. You can select every name on a single layer either by making all of the other layers invisible or by locking them. Holding down the "Option" key while clicking on a check mark or padlock in the "Layers" palette will turn off or lock all layers in one go.
- Choose "Select all" from the Edit menu and change the font using the "Type > Font" menu.
Using Style Sheets (FreeHand v7.0 or later):
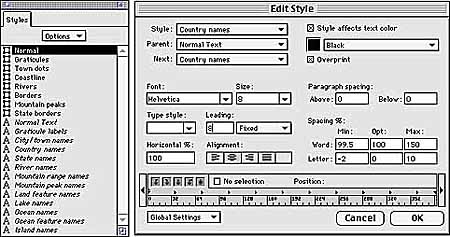
All of the FreeHand maps have names set up as "Style Sheets"--that is, you can globally change the attributes of names by editing each style. This is particularly useful if you need to retain the distinction between different font styles on a single layer, such as "Ocean Names" and "Ocean Features," which both appear on the "Physical Features, Ocean" layer. To edit Style Sheets:
- Make sure the "Style Sheets" palette ("Window" menu) is visible. Click on the text style you wish to change.
- Choose "Edit Style" from the pop-up menu. In the dialog box that appears, change the font attributes as you wish.
|
Text styles are defined for the FreeHand files. To change a style, select "Edit Style" from the "Options" pop-up menu. Any change you make will be applied to all occurrences of that text. |
Graphic Style Sheets
All of the lines and fills in the FreeHand maps are defined as Graphic Styles. Each can be globally edited as follows:
- Make sure the "Style Sheets" palette ("Window" menu) is visible. Click on the graphic style you wish to change.
- Choose "Edit Style" from the pop-up menu. In the dialog box that appears, change the graphic attributes as you desire.
As with text styles, The Edit Style dialog allows you to apply global changes such as stroke or fill colors, line weights, etc. to any graphic style defined in the "Styles" palette. 
Colorizing Relief TIFFs
Applying Global Color to a Relief Map
Applying color to a relief map in FreeHand couldn't be easier -- just follow these steps:
You can further adjust the contrast of the relief map by using the image editor on the Inspector palette (click on the Object Editor).
- Make the relief map visible by clicking to the left of the layer "Relief TIFF" on the Layers palette.
- Define a certain color using the "Color Mixer" palette or select a specific color -- such as a Pantone color -- from the "Options" pop-up menu on the "Color List" palette. If you defined your color in the Mixer, drag that color to the Color List palette, where it will automatically be given a name.
- Click on the grayscale relief map to make that layer active, then click on the color that you just defined in the Color List palette. This will immediately change the grayscale relief to the color you defined.
Applying Color Selectively
It's very easy to apply color selectively to the relief maps, such as to individual countries, but bear in mind that the following method can be very demanding on memory, so allocate as much memory as possible to FreeHand. To colorize an individual country:
- Select the placed Relief TIFF by clicking on it, then choose "Clone" from the "Edit" menu. This creates a copy of the relief map, placing it directly on top of the other.
- The cloned relief map should still be selected, so you can now apply a color to that map, as described in "Applying global color," above.
- Choose "Cut" from the Edit menu. This cuts the cloned map to the Clipboard.
- Select the path of the country you wish to colorize to make it active, then choose "Paste Inside" from the Edit menu.
- The relief map you just pasted will now be on the same layer as the country into which it was pasted, hiding information on the layers below, such as rivers, so drag the country layer and position it just above the "Relief TIFF" layer in the Layers palette.
Repeat the steps above to colorize further countries.MHM tip
SIMPLIFYING PATHS
Some of the paths in the FreeHand maps are highly complex--the coastline of Norway on map "5.10 Scandinavia," for example, contains no fewer than 2,500 points, excluding islands! So if your final map size will end up smaller than that provided on the disc, it is a good idea to reduce the number of points in a path. The effect of this is threefold: firstly, the map will be less demanding on memory, particularly if you are pasting multiple TIFF images into the map; secondly, the file size will be smaller; and finally, the line will be less prone to "clogging" (filling in with ink) if simplified. To simplify a path in FreeHand, use the "Path Operations > Simplify..." command from the "Arrange" menu.

Outputting Maps from FreeHand
If you are going to use a map in another application such as QuarkXPress after you have worked on it in FreeHand, you must Export it as an "EPS" file. However, before you do so there are a few things you must do first:
- If you want the relief TIFF to be embedded in the EPS, make sure that you have checked "Embed TIFF/EPS upon import rather than link" in the "Export > Import/Export" section of FreeHand Preferences ("File" menu). You will need to update the link by selecting the TIFF, and then pressing the "Links..." button on the Object Editor. In the dialog box that opens, ignore the message telling you that there is already a link established, and double-click on the highlighted file name.
- Although some layers of your map may not be visible, they will be included in the exported EPS file unless you have unchecked "Include invisible layers" in "Output Options" under the "File" menu.
|
MHM
tip
OUTPUTTING FILES
Top: To use a map in another application -- such as a page layout program -- you must save the file as an EPS file. If you want to include the relief layer as part of the file, you must "Embed" the TIFF file -- click on the "Links" button in the Object Editor. Bottom: If you have "switched off" some of the layers on your map, be sure to uncheck "Include invisible layers" box ("Output Options") before exporting the file as an EPS. |
Any comments or problems with this
site? Please
let us know
- thank you!
©2017 Digital Wisdom, Inc.