MHM Tutorial - Using digital maps
For this project, we used the newly released Mountain High Maps Continental Edition version 2.5, which contains stunning and customizable 300ppi relief maps and editable outline maps of every part of the world, together with prepared masks, paths and data layers which save an incredible amount of time in the customizing process. The Continental Edition splits the world into four regions so that you don't have to shell out for the whole planet if you just need maps of Europe, for example.
This exclusive tutorial takes you step-by-step through the process of creating a final map in Adobe PhotoShop. And so that you can reproduce the same map on your computer, Digital Wisdom has made all the files available for inclusion on this sampler. Your free Mountain High Maps kit includes not only the base Greece map and associated PhotoShop masks and Paths files but also the background image we used (courtesy of DigitalVision royalty-free digital stock photography library) and the clip-art embellishments. Everything you will need to complete this tutorial can be found in the Tutorial folder on your sampler. In fact, you could even use the masks and paths on their own to create your own flat-fill high-resolution maps - and you will quickly discover, if you haven't already, how valuable masks and paths can be in your work process.
The graphic designer's armoury of resources is often stretched to the limit by clients who request the earth - sometimes literally – and expect it to be delivered within 24 hours. Even the good Lord had seven days in which to conjure up similar miracles. So when Greek Island Cruise Lines asked us to produce overnight a customized map of Greece for their new holiday brochure we knew that we could never do it in time if we started from a blank sheet of paper. As cartographers can testify, map creation is a complex business, full of tedious pitfalls such as the accuracy of country borders and the location of towns and physical features. And none could be worse than Greece with its acne of islands breaking out all over the Aegean. Some designers might be tempted to scan a page from an atlas but copyright considerations apart, this brings its own problems, not least of which is the amount of time it takes to remove all the text, graticules (lines of latitude and longitude), moire and other elements you don't want or can't read. It's still a long job to create a good high resolution map - one that a designer can customize sufficiently to meet the brief....and keep a clear conscience.
Properly equipped designers know that maps and globes are graphic elements that will be used frequently throughout professional life. The prepared designer will have already kitted out his or her toolbox with one or more of the exceptionally good digital map-making resources available to today's digital artists.
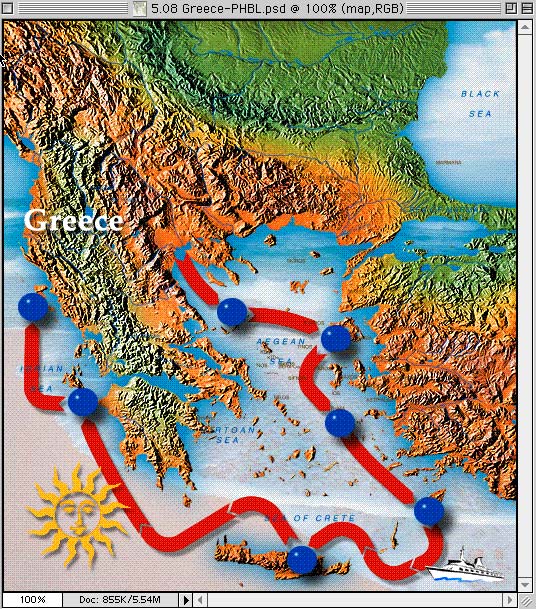
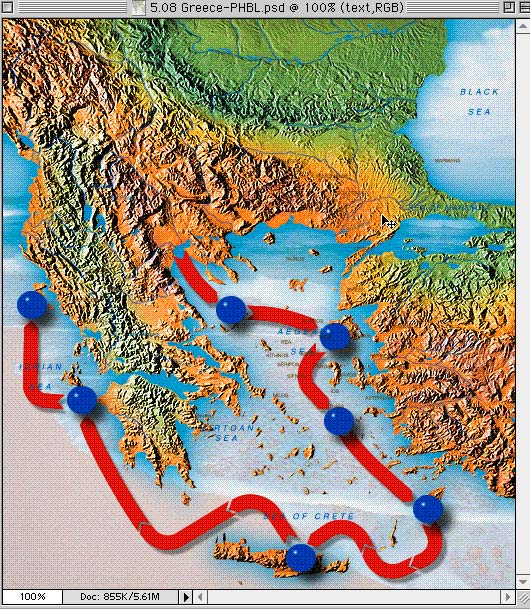
The client briefed us to produce an eye catching, holiday-flavoured map of the region without much mainland information but with plenty of detail around the islands. They also wanted a bold graphic to illustrate the cruise ship route through the islands and they asked us to pick out the strong red and blue colours used in the brochure spread.
Planning ahead may be tedious but with a high-resolution multi-layered PhotoShop file it is always a good idea to work out how many layers you will need and the likely eventual file size - if only to ensure that PhotoShop will be able to complete each instruction and save the layered file. Our pre-press map version quickly ballooned from 14MB to almost 10OMB, which means that PhotoShop’s scratch disk system will use all of a 500MB scratch disk partition. But your scratch disk is 2GB, right? A new full coverage layer, such as our background image, will increase the document size by another 14MB, while even a layer with a single pixel on weighs in at 200K. The 72ppi files on the cover disc won't cause you any scratch disk embarrassment, but we took the precaution of ensuring that we had 1GB of free scratch space for the 300ppi pre-press image. This way, we could retain a copy of the final multi-layered file in PhotoShop format in case the client subsequently asked for a change to any part of the image.
There are some pre-press designers who work in CMYK mode right from the gun, but most prefer to work in RGB and leave the CMYK conversion to the very end of the workflow. This way, the document size is kept as small as possible (three colour channels instead of four) and the designer retains access to all the PhotoShop and third-party filters (some important ones, such as Render and Lighting Effects, Texture and some KPT filters are not accessible in CMYK mode). However, since PhotoShop 4 we can enjoy the best of both worlds by working on an RGB image while enabling the View menu's CMYK Preview option.
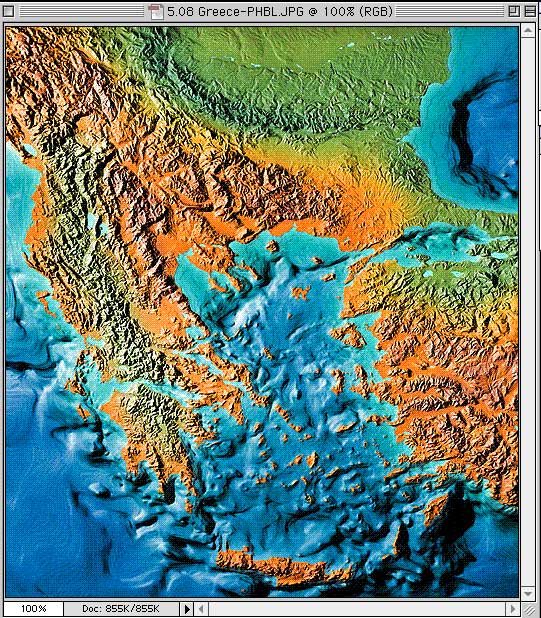
1. In the beginning there was Greece. Open the file Greece.jpg (in the Maps folder). We chose this pre-colourized physical map because it conveys through relief shading some of the scenic beauty of the region. If we had needed to add legible place and feature names to the land mass (we only needed a handful of mainland names in this instance) we would have had to tone down the image colours to make the text legible, or use instead one of the political maps without relief shading. We could also have created a 'flat fill' map in Illustrator or FreeHand using one of the provided multi-layered vector map files.

2. Open the PhotoShop ocean mask file - this is the file named Ocean.jpg in the Masks folder. With the mask image active (but not totally obscuring the map image) and the Channel palette displayed drag the mask's black channel and drop it on the map image. Close the mask file and make sure that you have a new Channel #4 in the map image.
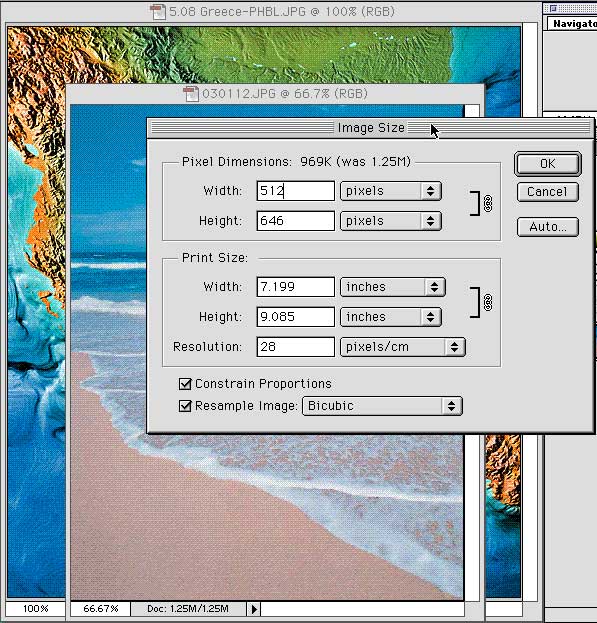
3. Now open the background image - this is the DigitalVision stock photo library file named Beach.jpg in the Clipart folder. First of all, it needs to be resized to match the target image, so in the Image Size window, with Resample Image checked, change the width of this image to 512 pixels. Next, with the Move Tool selected, drag & drop the image onto the target map document while holding down the Shift key; then close the source image window.
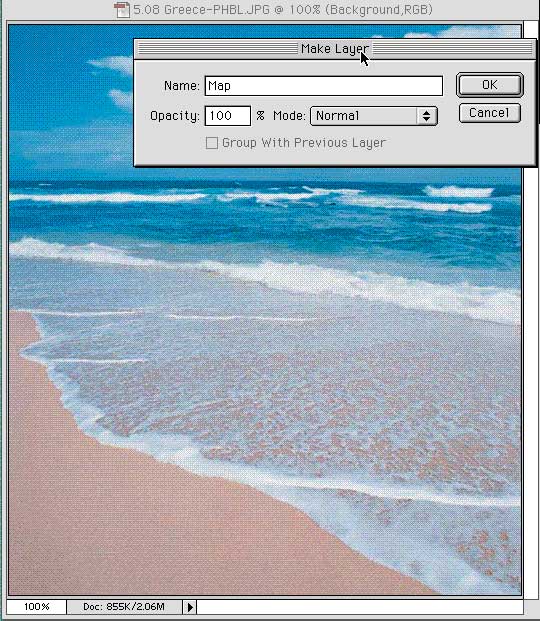
4. We need transparency on the background layer so we double click it in the Layers palette and rename it 'Map' in the resulting dialogue window. Now we can drag this layer above the beach scene layer we just added. Rename the beach scene layer 'Backdrop'.
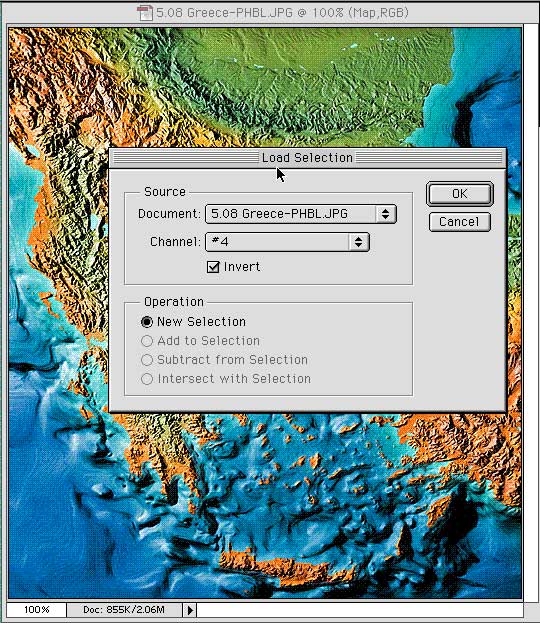
5. With the Map layer activated, choose Load Selection from the View menu, check the Invert box and select Channel #4. All the wet areas are now selected so hit the Delete key to reveal our background layer.
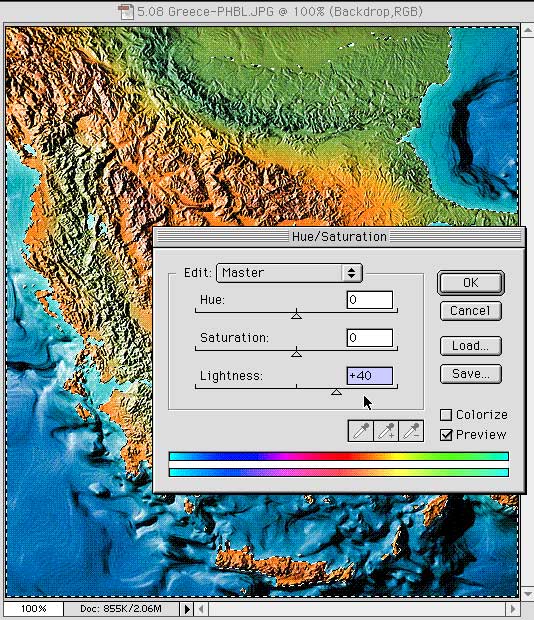
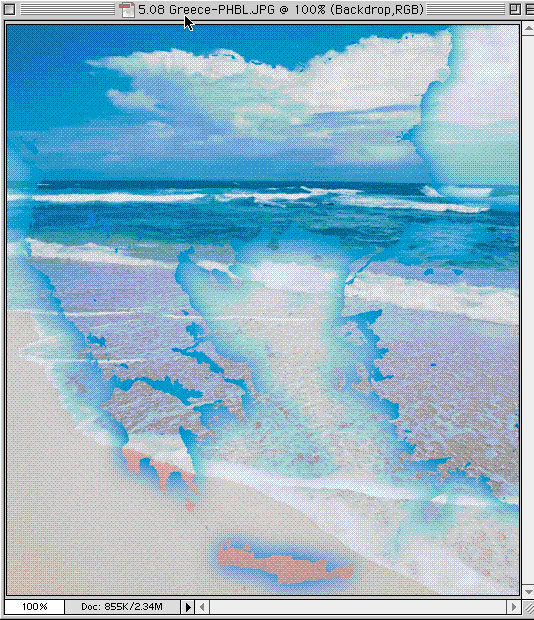
6. We need to tone down the background image so that we can see the Greek Islands and their names, which we will be adding later. With the Backdrop layer activated, select Hue/Saturation from the Image and Adjust menu, and enter +40 for the Lightness slider. We still need to lift the map image so that it stands out from the background and we'll do this by applying a vignette around the coastline with the help of another mask. Open the file named Vignette.jpg in the Masks folder and repeat the process used earlier to drag its channel to the map image.
7. Pick a light blue - we used R 14 G 140, B 210 as briefed - and with the Backdrop layer activated (we poked the eye of the Map layer to make it invisible but this isn't necessary), load the selection in Channel #5, without inverting. Press Alt-Delete to fill the feathered selection area with the foreground colour.
8. Now create a new layer for the cruise route graphic and define a fill colour (we used R 216, G 40, B 0 to match the brochure red). Switch to the Paths palette and you will see that your map image came complete with path defining route arrows (you could instead create your own or use any other arrow style). Make sure this path is highlighted and from the Paths palette pop-up menu, select Fill Path. Click away from the highlighted path to deactivate it.
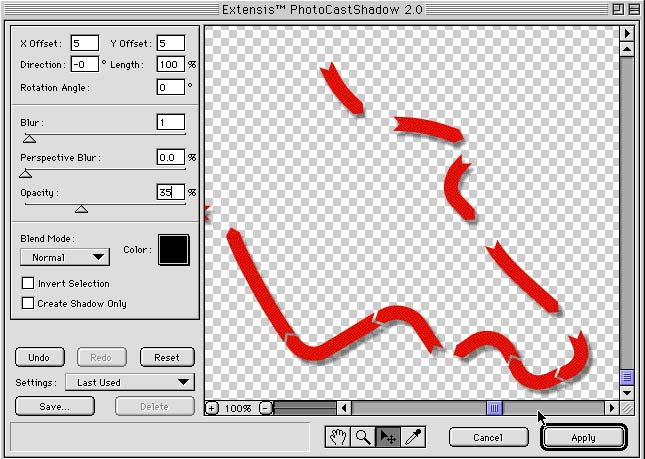
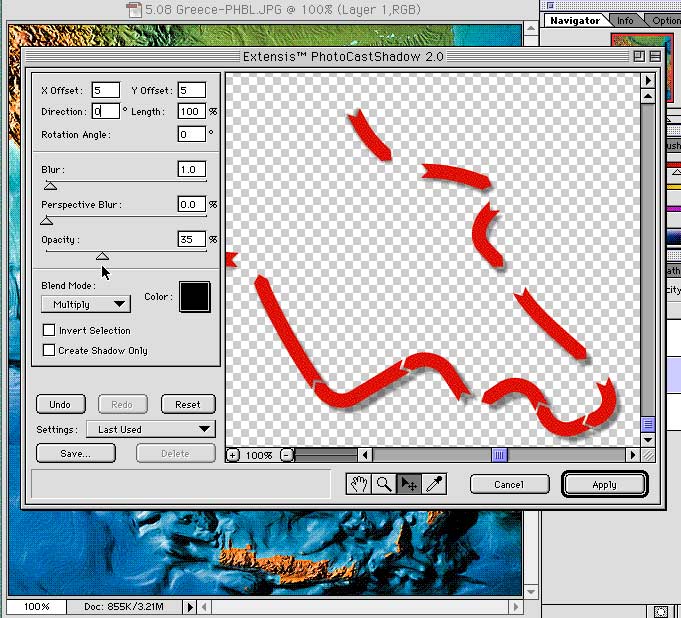
9. Next we created a drop shadow for the route arrows using Extensis PhotoTools PhotoCastShadow, setting x and y offsets to 5, blur to 1.0 and opacity to 35 per cent. Then we added a 'Portballs' layer in order to create some marker spheres to denote ports of call. On this layer we made an 83-pixel diameter circular selection and defined a light blue to dark blue gradient in the Gradient Tool Options Edit window. After dragging the Gradient Tool across the circle we added a white highlight with a soft brush.
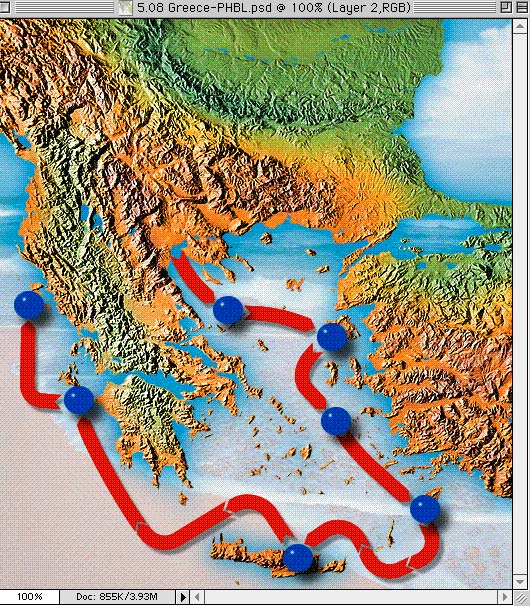
10. After moving this sphere into position between the route arrows, we made sure it was still selected (if not, Load the Portballs Layer Transparency Channel from the Select and Load Selection window). Now, with the Move Tool selected and the Alt key down, drag a copy of the sphere to the next location. Repeat to create all seven spheres. Then, with the Portballs layer still active, use PhotoCastShadow to create a shadow for the layer. Because we wanted the balls to appear to float above the arrows, we chose a softer shadow (4.3 blur) and bigger x, y offsets (10); we set the mode to Multiply and opacity to 70 percent.
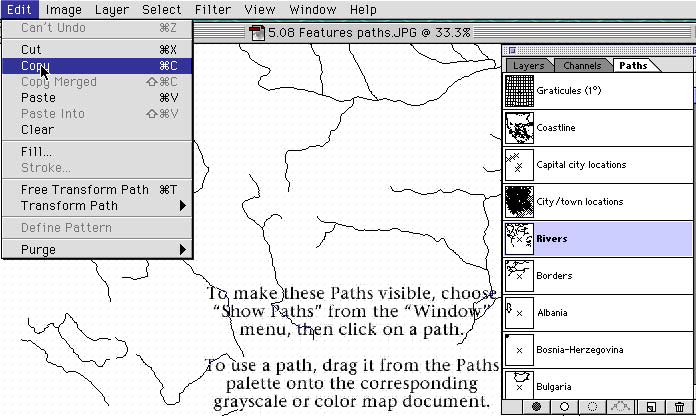
11. Time now to add some detail. Create a new layer and call it Text. We will now import several Photoshop paths to help us to create place names and feature details. Open the two Paths files - Features.jpg and Names.jpg that you will find in the Paths folder. If this takes more memory than you have available don't worry, open and utilize the document's one at a time. Make the Features paths window active and click on its Paths palette to see all 15 paths embedded in this document. For our project, we need to transfer two paths from this file to the map image - Capital City locations and Rivers. In order to size these high resolution paths automatically to the 72ppi target map image, simply highlight the path we want in the palette, copy, switch to the map image and paste the path into the Paths palette of the map document. The Paths will appear on the Map document looking distorted until you fill the paths in step 12 so stay calm. Do this for both paths, and then bring the Names path window to the front and copy and paste three paths from this document into the map image - Capital city names, Physical features oceans/lakes, and Island names. You should now have six paths visible in the map image Paths palette.
12. First, we will add the rivers. Switch to the Map layer, sample a blue from one of the lakes on the map and click on the Rivers path to highlight it. From the Paths palette pop-up menu select Stroke Subpaths and accept the default Paintbrush option. When you click away from the path to deactivate it, you will see that the rivers are now painted in. Switch to the new Text layer and pick a colour for the ocean feature names. We chose a dark blue (R 37, G 98, B 195). Activate the Physical features oceans/lakes path and select Fill Path from the pop-up menu. Click on OK to accept the defaults in the resulting dialogue window. Now activate the Island names path and choose a dark colour - we sampled a brown (R 97, G 68, B 7) from the mountain relief shading - and Fill Path again. Do the same with the Capital City names (white) and Capital City locations paths (we sampled the red fill used for the route arrows).
13. Tidying up. If we take a close look at the Text layer, we can see that some of the ocean feature names overlap parts of our route graphic. For instance, we will leave text on top of the red arrows since there is nowhere else for it to go. But we must move the ones that overlap the spheres. To move a name, simply select it quickly with the Lasso or Rectangular Marquee Tool and hold down the Command key while dragging it to a different location. If you want to see more clearly, select Hide Edges (Command-;) from the View Menu. To remove the lake names, simply select them and hit Delete. The final text task is to add the country name using the Text Tool. We opted for the appropriate looking Lithos Bold font at 24pt and then gave it a drop shadow to make it more prominent. When done, you can select Merge Down from the Layers palette pop-up menu to combine the new text layer with the Text layer below.
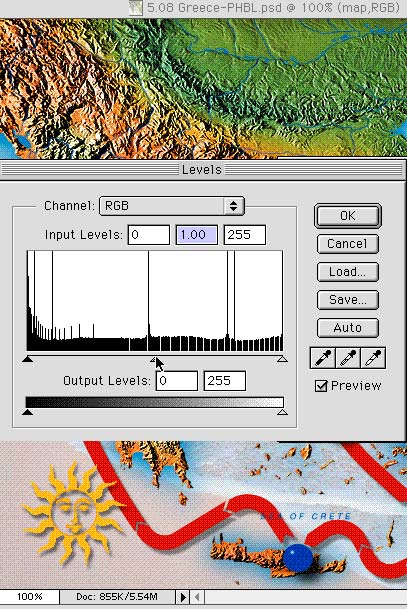
14. For the final touches open the two PhotoShop clip-art files, Ship.psd and Sun.psd from the Clipart folder. Drag-&-drop the Ship graphic into the bottom right corner of the map image and drop the Sun graphic into the bottom left corner. We overlapped them both slightly with the route arrows so as to integrate them into the scene and we finally gave the sun the same soft drop shadow as the blue spheres before merging the two clip-art layers. We felt that the Map layer needed to stand out a little more from the background image. Since we felt that the background image was already toned back far enough, we adjusted the Map layer's Levels midtones slider from 1.00 to 0.80. Save the file with all layers, masks and, paths intact in case we need to make corrections later. Then flatten the document, remove the paths and masks and Save as a TIFF - leaving the image in RGB format so that the client's desktop publishing team can convert to CMYK prior to sending the file to the printer.
15. Voila! The map is done and ready to be proofed by the client. Congratulations!
Back to User Guide Menu