Online User Guide - BodyShots Business
For additional information, please see the BodyShots Frequently Asked Questions.

5. Using the images
All of the BodyShots images are photographed against a white
background. This makes it easy for you to assemble two or more
images into a single scene or to paste images onto a background
of your choice or both!

|

|
Several figures can be grouped
into a single scene
|
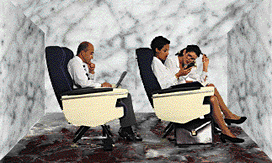
Images can be pasted onto a background to
create a surreal effect
|
Pasting images onto a background
To overlap two images or paste an image onto a background,
use an imagemanipulation application such as Adobe Photoshop,
and follow these steps:
- Open your background image, and adjust it to the size you want
(choose "Image Size" from the "Image" menu). Keep this
image open.
- Open your foreground image, and adjust it to the
appropriate size to fit onto the background.
- With the foreground image active, choose "Select
All" from the "Select" menu.
- Now click on the background image window to make
it active, and choose "Paste" from the "Edit"
menu. The foreground image is pasted onto the background, but
within a white rectangular area which obscures some of the background.
- Without deselecting the pasted image, choose
"Composite Controls" from the "Edit" menu.
In the "Mode" pop-up menu in the dialog box which
appears, choose "Multiply." The pasted image now
blends with the background image. Click "OK," and
then move the pasted image to where you want it on the background.
- Now make the foreground image active by clicking on
its window. Double-click on the Magic Wand tool to open its Options
dialog box. Set the tolerance to zero, and check the "Antialias"
box. Click "OK."
- With the Magic Wand selected, click on the white backdrop to
the BodyShots figure. Choose "Inverse" from the "Select"
menu.
- Choose "Copy" from the "Edit" menu.
- Make the window with the background active, and
choose "Paste" from the the "Edit" menu.
Move the pasted figure so that it sits exactly on top of the
figure you pasted in step 4 (choose "Hide Edges"
from the "Select" menu to make positioning clearer
use the arrow keys on your keyboard for fine tuning).
- Finally, choose "Defringe" from the
"Select" menu the pixel width you specify will
depend on how large your image is, but one or two pixels is
usually sufficient.
Pasting vignettes onto a background
BodyShots images can be vignetted onto a background by creating
a graduated mask:

- Using the Lassoo tool, select the area of your background where
you want to place a BodyShots image.
- Create a new channel in the "Channels" window. Your
selection boundary is visible in the new channel. Select "Feather"
from the "Select" menu, and enter a radius which is appropriate
for the degree of vignette you require. You may need to experiment with
different radius values to find the one which is best for your image.
- Fill the selection with 100% black ("Edit"
menu), and then choose "Map" > "Invert"
from the "Image" menu.
You now have a vignette mask. To place the BodyShots image:
With your BodyShots image open, double-click on the
Magic Wand tool to open its Options dialog box. Set the tolerance
to zero, and check the "Antialias" box. Click "OK."
With the Magic Wand selected, click on the white
backdrop to the BodyShots figure. Choose "Inverse"
from the "Select" menu.
Choose "Copy" from the "Edit" menu.
With the window of your background image active,
choose "Paste Into" from the the "Edit" menu.
Move the pasted figure so that it sits exactly where you want it.
PREV PAGE | NEXT PAGE

Any comments or problems with this
site? Please
let us know
- thank you!
© Digital Wisdom, Inc.


